Making a Minecraft TNT Cake has become one of my favorite kitchen adventures! The first time I tried it, I wanted a cake that looked exactly like the iconic red TNT block from the game, and seeing it come to life felt so satisfying. The crisp edges, bright red fondant, white stripes, and bold “TNT” label made it look like a perfect edible Minecraft block. And once I sliced into it, everyone loved how fun and playful it felt. It’s surprisingly simple to create, and the final result always steals the show at birthdays and Minecraft-themed parties.
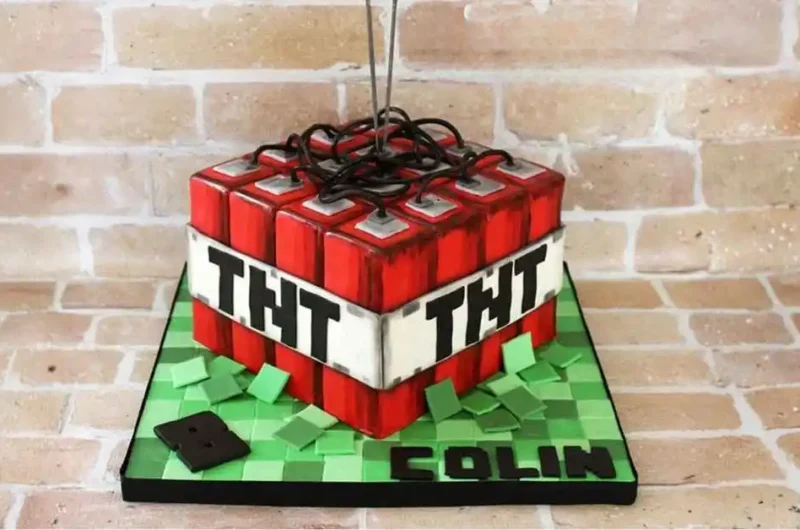
How to Make a Minecraft TNT Cake
10-12
servings45
minutes35
minutes420
kcalIngredients
- For the Cake:
All-purpose flour – 2 ½ cups
Cocoa powder – ½ cup
Sugar – 1 ¾ cups
Eggs – 3
Baking powder – 2 tsp
Baking soda – 1 tsp
Milk – 1 cup
Vegetable oil – ½ cup
Boiling water – 1 cup
Salt – ½ tsp
Vanilla extract – 1 tsp
- For the Frosting:
Butter – 1 cup (softened)
Powdered sugar – 3 cups
Cocoa powder – ¼ cup
Milk – 2–3 tbsp
Vanilla extract – 1 tsp
- For Decoration:
Red fondant – 500g
White fondant – 200g
Black fondant – 100g
Edible glue – as needed
Directions
- Preheat oven to 350°F (175°C) and grease two 8-inch square cake pans.
- Whisk flour, cocoa, sugar, baking powder, baking soda, and salt in a bowl.
- Add eggs, milk, oil, and vanilla, then mix until smooth.
- Pour in boiling water and stir carefully until the batter is thin and combined.
- Divide batter into pans and bake 30–35 minutes until a toothpick comes out clean.
- Cool cakes completely on wire racks.
- Prepare frosting by beating butter until creamy.
- Add powdered sugar, cocoa, milk, and vanilla, then mix until fluffy.
- Level the cakes and stack them with frosting in between.
- Spread a thin crumb coat of frosting and chill for 20–30 minutes.
- Roll out red fondant and cover the entire cake smoothly.
- Roll white fondant into strips and place them horizontally around the center.
- Cut black fondant to form the letters “TNT” and stick them onto the white strip.
- Trim edges for a clean block shape and chill before serving.
Nutrition Information (Approx. per slice)
- Calories: 420
- Carbohydrates: 58g
- Protein: 5g
- Fat: 18g
- Sugar: 45g
- Fiber: 2g
Expert Tips and Variations
For the best TNT cake, use a sturdy cake like chocolate sponge or pound cake and chill it well before stacking; substitute fondant with red and white buttercream if you prefer a softer finish, and add flavor twists like chocolate ganache, caramel filling, or strawberry jam for extra richness. Use a ruler to cut straight fondant strips to keep the Minecraft block shape neat, freeze the cake briefly before final frosting to avoid crumbs, and don’t apply fondant on warm frosting or skip chilling, as this can cause sliding or bulging.
How to Store and Reheat Minecraft TNT Cake
Store the cake in an airtight box in the fridge for 3–4 days. Keep it away from moisture if covered with fondant to prevent sweating. Let slices sit at room temperature for 20–30 minutes before eating for the best texture. If reheating, remove the fondant first and warm the cake slice lightly.
FAQs – Minecraft TNT Cake
What size cake pan is best for a TNT cake?
Square 8-inch pans work perfectly to create the classic Minecraft block shape, but you can scale up or down as needed.
Do I need fondant to make a TNT cake?
No, you can use red and white buttercream instead of fondant. The results will still look great as long as you use smooth, clean edges.
How do I get the cake edges sharp like a Minecraft block?
Chill the cake after frosting it and use a bench scraper to smooth the sides. Cool, firm frosting helps maintain clean edges for a block-like shape.
What flavors work best for a TNT cake?
Chocolate sponge, red velvet, or vanilla cake all work well because they hold their shape when stacked and carved.